> ## Documentation Index
> Fetch the complete documentation index at: https://docs.retellai.com/llms.txt
> Use this file to discover all available pages before exploring further.
# Agent versions and tags
> Create, publish, and delete agent versions, then point phone numbers at prod and staging environment tags to switch versions without updating each number.
An agent can have several versions, each with its own configuration. Versions let you keep earlier work as you make changes and choose which configuration your calls use.
## Draft and published versions
A new version starts as a **draft**, which you can edit and test. **Publishing** makes that version read-only, giving you a fixed configuration you can return to later. To continue making changes, create another draft from it.
Both draft and published agent versions can be attached to [phone numbers](/deploy/purchase-number).
Version numbers start at **V0** and increase each time you create a new version. Publishing keeps the same number and removes the draft label: **V2 (draft)** becomes **V2**.
## Manage versions
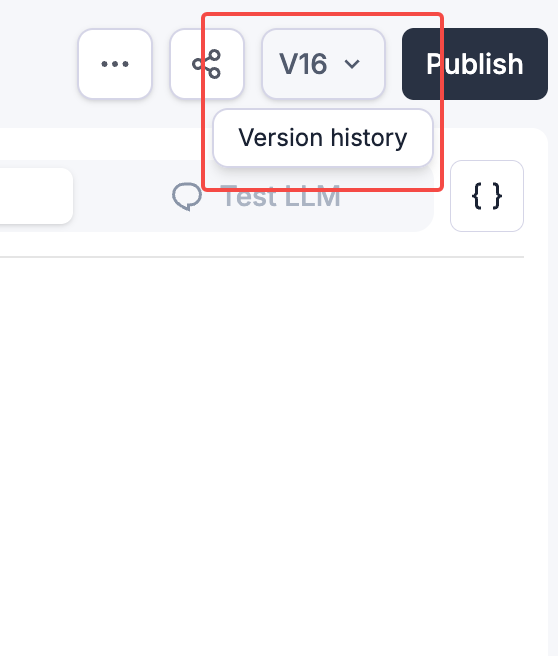
Click the version button in the upper right corner of the agent page to open the versions panel.
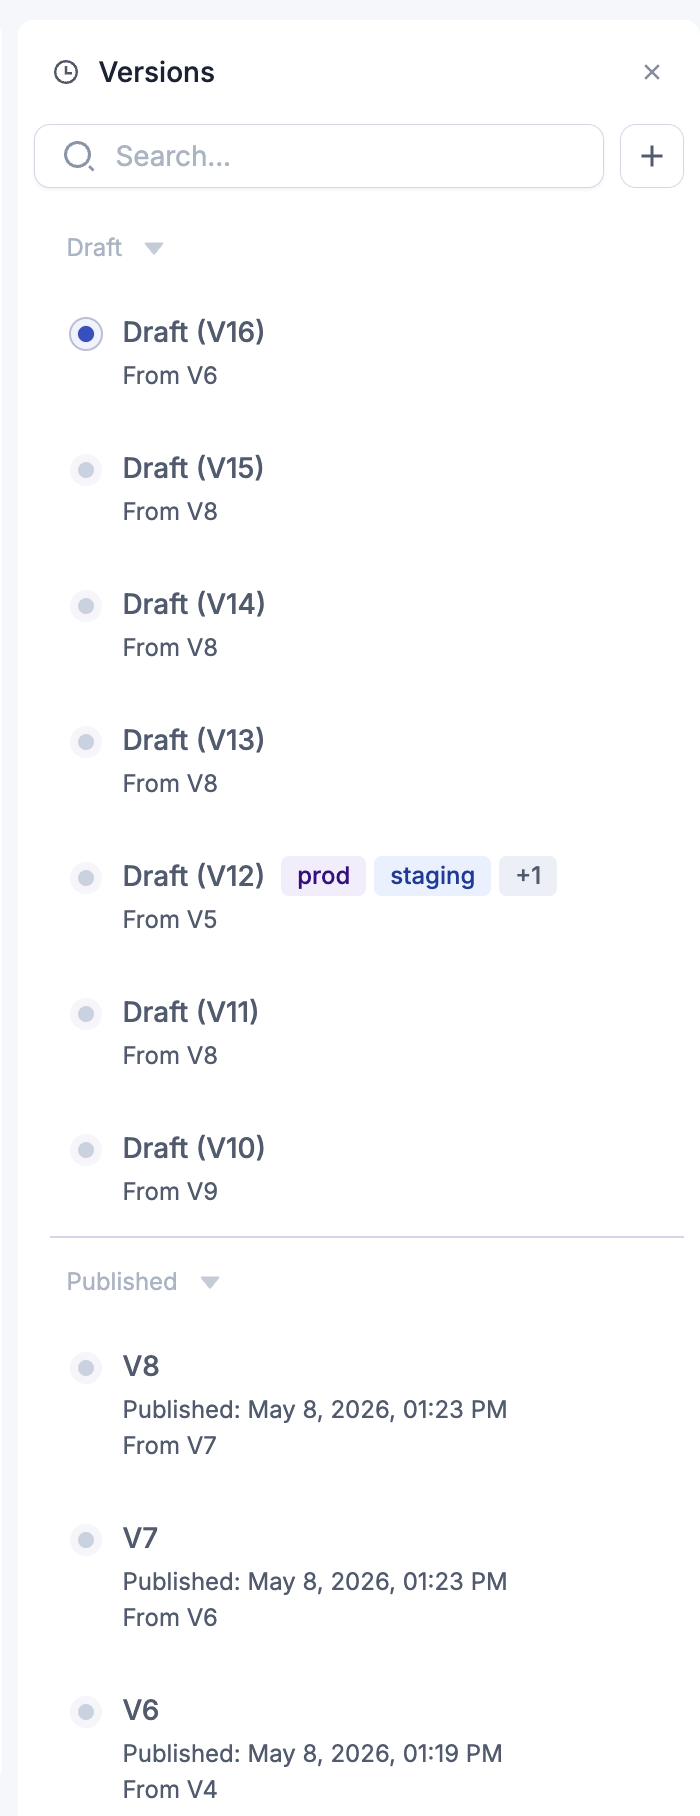
The panel groups versions under **Draft** and **Published**. Select a version to open its configuration. Drafts also show which version they were created from, so you can trace a change back to its starting point.
### Create a draft
Select the version you want to start from, then click **+** in the versions panel. The new draft is a copy you can edit without changing the source version.
You can create a draft from any past version, and keep several drafts at once to try different approaches. Give each draft a [test call](/test/test-phone) before deciding which one to use.
### Publish a draft
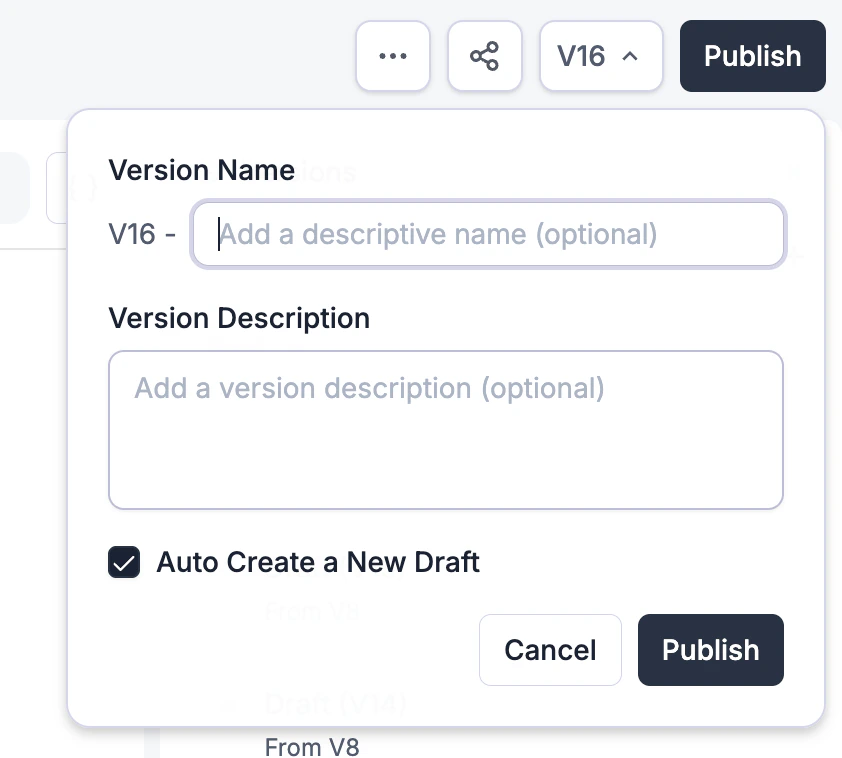
Select your draft and click **Publish** in the upper right corner of the agent page, then confirm in the dialog.
### Delete a version
Open the versions panel, select the version you no longer need, and use the delete option. If it's a published version with phone numbers or environment tags attached, remove those assignments first.
## Environment tags
An environment tag is a name that points to an agent version. Assign a phone number to a tag, and it follows whichever version the tag points to. This is useful when you want to switch versions without updating each phone number's settings.
For example, your production number could use the `prod` tag, assigned to **V2**. While it continues to use **V2**, you can test **V3**. When you're ready to switch, move `prod` to **V3**. To return to the previous configuration, move it back to **V2**.
Each agent starts with `prod` and `staging` tags. A version can have more than one tag, so both can point to the same version if needed.
### Create and configure a tag
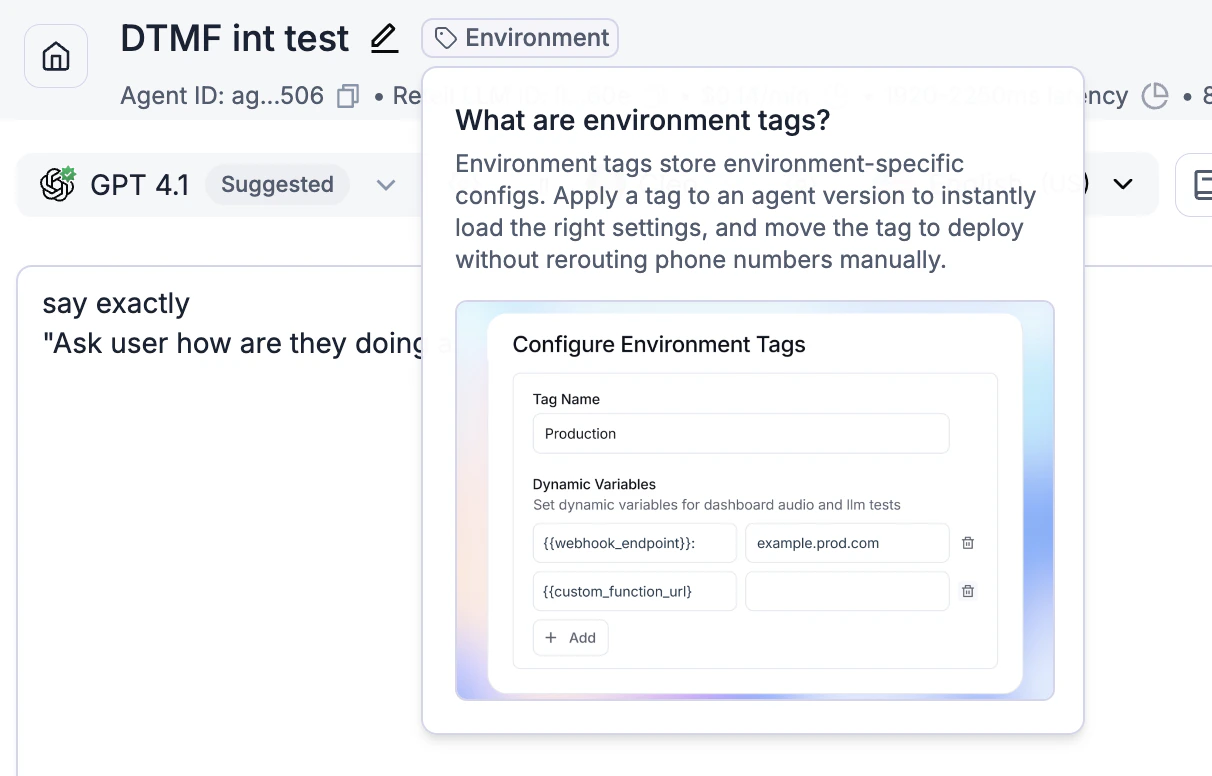
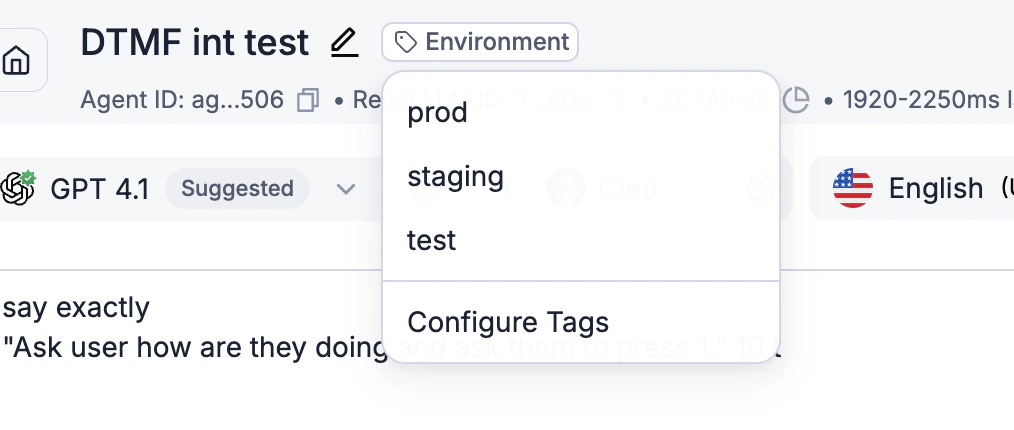
Click **Environment** in the agent header, then **Configure Tags**. Choose an existing tag to edit its settings, or click **+ Add** to create one. Each agent can have up to **10 tags**, including the defaults.
You can set [dynamic variable](/build/dynamic-variables) values for each tag in this dialog. Those values are supplied when a call uses the tag.
For example, an agent might use a dynamic variable for its transfer destination. Set that variable to your own number under `staging` and your team's number under `prod`. You can then test transfers on the same agent version without sending test calls to your team.
### Assign or move a tag
In the versions panel, select the version you want the tag to use. Click **Environment** in the agent header and choose the tag. Its label appears beside the version.
To move a tag, repeat these steps on a different version. Phone numbers that use the tag follow the change; phone numbers assigned directly to a version stay on that version.
This documentation is built and hosted on [Mintlify](https://mintlify.com), a developer documentation platform.
 The panel groups versions under **Draft** and **Published**. Select a version to open its configuration. Drafts also show which version they were created from, so you can trace a change back to its starting point.
 ### Create a draft
Select the version you want to start from, then click **+** in the versions panel. The new draft is a copy you can edit without changing the source version.
You can create a draft from any past version, and keep several drafts at once to try different approaches. Give each draft a [test call](/test/test-phone) before deciding which one to use.
### Publish a draft
Select your draft and click **Publish** in the upper right corner of the agent page, then confirm in the dialog.
### Create a draft
Select the version you want to start from, then click **+** in the versions panel. The new draft is a copy you can edit without changing the source version.
You can create a draft from any past version, and keep several drafts at once to try different approaches. Give each draft a [test call](/test/test-phone) before deciding which one to use.
### Publish a draft
Select your draft and click **Publish** in the upper right corner of the agent page, then confirm in the dialog.
 ### Delete a version
Open the versions panel, select the version you no longer need, and use the delete option. If it's a published version with phone numbers or environment tags attached, remove those assignments first.
## Environment tags
An environment tag is a name that points to an agent version. Assign a phone number to a tag, and it follows whichever version the tag points to. This is useful when you want to switch versions without updating each phone number's settings.
For example, your production number could use the `prod` tag, assigned to **V2**. While it continues to use **V2**, you can test **V3**. When you're ready to switch, move `prod` to **V3**. To return to the previous configuration, move it back to **V2**.
Each agent starts with `prod` and `staging` tags. A version can have more than one tag, so both can point to the same version if needed.
### Delete a version
Open the versions panel, select the version you no longer need, and use the delete option. If it's a published version with phone numbers or environment tags attached, remove those assignments first.
## Environment tags
An environment tag is a name that points to an agent version. Assign a phone number to a tag, and it follows whichever version the tag points to. This is useful when you want to switch versions without updating each phone number's settings.
For example, your production number could use the `prod` tag, assigned to **V2**. While it continues to use **V2**, you can test **V3**. When you're ready to switch, move `prod` to **V3**. To return to the previous configuration, move it back to **V2**.
Each agent starts with `prod` and `staging` tags. A version can have more than one tag, so both can point to the same version if needed.
 ### Create and configure a tag
Click **Environment** in the agent header, then **Configure Tags**. Choose an existing tag to edit its settings, or click **+ Add** to create one. Each agent can have up to **10 tags**, including the defaults.
### Create and configure a tag
Click **Environment** in the agent header, then **Configure Tags**. Choose an existing tag to edit its settings, or click **+ Add** to create one. Each agent can have up to **10 tags**, including the defaults.
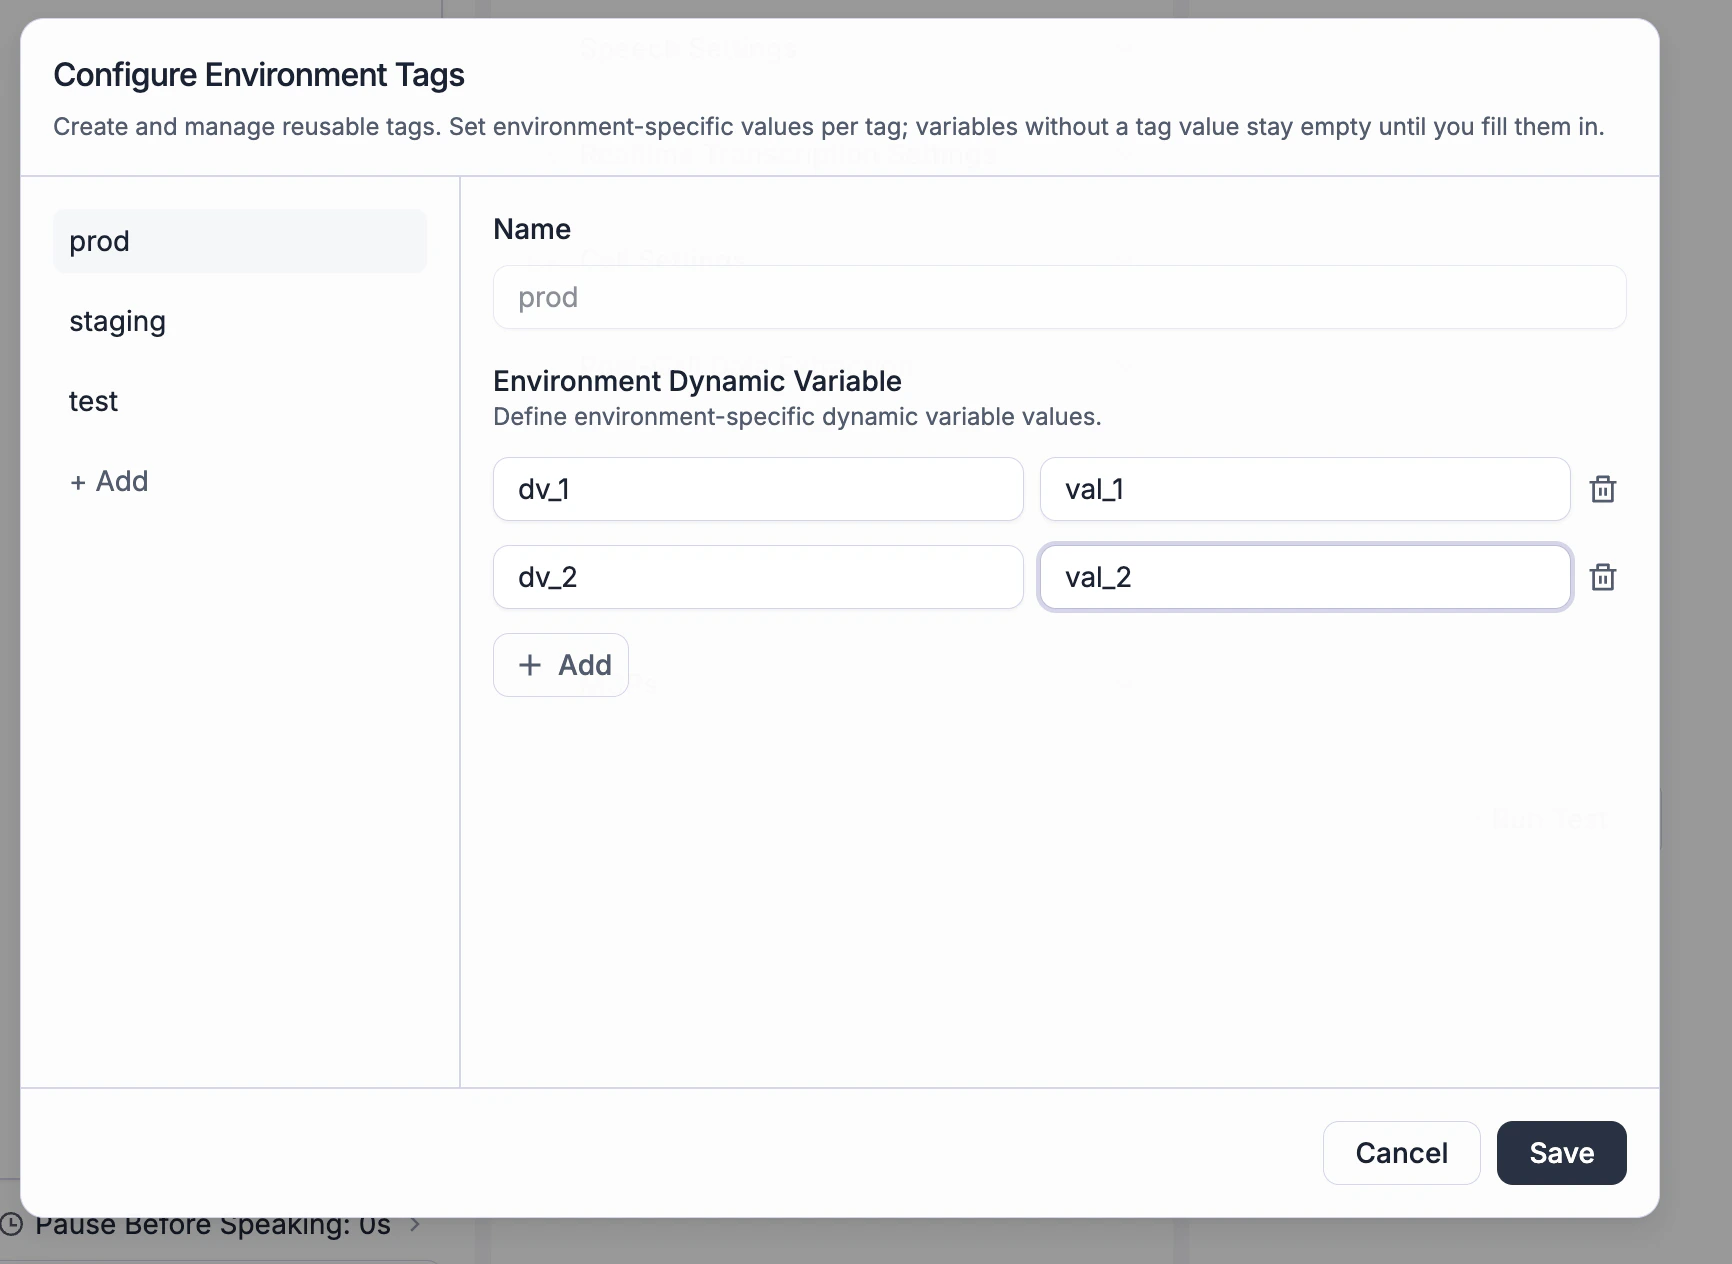 You can set [dynamic variable](/build/dynamic-variables) values for each tag in this dialog. Those values are supplied when a call uses the tag.
For example, an agent might use a dynamic variable for its transfer destination. Set that variable to your own number under `staging` and your team's number under `prod`. You can then test transfers on the same agent version without sending test calls to your team.
### Assign or move a tag
In the versions panel, select the version you want the tag to use. Click **Environment** in the agent header and choose the tag. Its label appears beside the version.
To move a tag, repeat these steps on a different version. Phone numbers that use the tag follow the change; phone numbers assigned directly to a version stay on that version.
You can set [dynamic variable](/build/dynamic-variables) values for each tag in this dialog. Those values are supplied when a call uses the tag.
For example, an agent might use a dynamic variable for its transfer destination. Set that variable to your own number under `staging` and your team's number under `prod`. You can then test transfers on the same agent version without sending test calls to your team.
### Assign or move a tag
In the versions panel, select the version you want the tag to use. Click **Environment** in the agent header and choose the tag. Its label appears beside the version.
To move a tag, repeat these steps on a different version. Phone numbers that use the tag follow the change; phone numbers assigned directly to a version stay on that version.
 This documentation is built and hosted on [Mintlify](https://mintlify.com), a developer documentation platform.