> ## Documentation Index
> Fetch the complete documentation index at: https://docs.retellai.com/llms.txt
> Use this file to discover all available pages before exploring further.
# Nodes and edges
> Nodes are the building blocks of Retell conversation flows. Learn every node type, how edges connect them, and how transition conditions advance calls.
A conversation flow is a graph of **nodes** connected by **edges**. Each node handles one step of the call — talking with the user, running a tool, branching on data, transferring, or ending the call. Each edge carries a [transition condition](/build/conversation-flow/transition-condition) that decides when the agent moves to the next node.
Node boundaries let you limit context and control execution, but can restrict how the conversation proceeds. Read [conversation flow best practices](/build/conversation-flow/best-practices) before deciding how to divide your task.
## Pick a node type
Each node type plays a specific role. Pick the type that matches what the step needs to do.
### Dialogue nodes
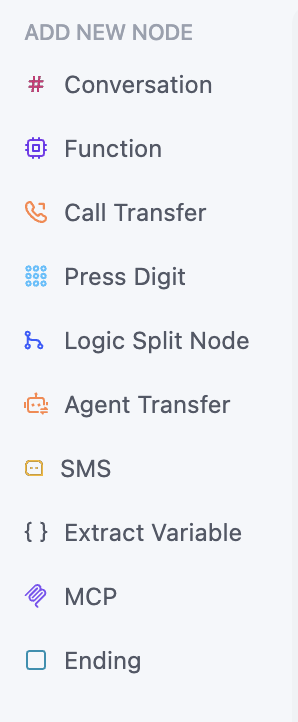
* [**Subagent Node**](/build/conversation-flow/subagent-node): Dialogue where the agent can also call tools/functions based on context. Unlike a function node (which executes deterministically on entry), the LLM decides **whether and when** to invoke each tool from what the user says. Supports multiple tools per node and stays active across multiple turns and tool calls before transitioning. Use a function node instead when a tool must always run at that step.
* [**Conversation Node**](/build/conversation-flow/conversation-node): Pure dialogue with the user — no tool calling. The agent can hold a multi-turn conversation within a single node, so you don't need a new node for every line. Supports two instruction modes: **Prompt** (the LLM generates responses dynamically) and **Static Sentence** (the agent says a fixed line first, then continues dynamically if the conversation stays in the node). Transitions are evaluated after each user response.
* [**Extract DV Node**](/build/conversation-flow/extract-dv-node): Extracts information from the conversation so far and stores it as dynamic variables on entry — not for dialogue. The LLM analyzes the full conversation to capture each value you define by name, description, and type (Text, Number, Enum, or Boolean). Useful for structured data that downstream nodes or Post Call Extraction need.
### Action nodes
* [**Function Node**](/build/conversation-flow/function-node): Executes a single tool/function deterministically on node entry — not for dialogue. Turn on **Wait for Result** when the next hop depends on the return value, then branch on the outcome directly from this node. The agent can optionally speak while it runs (e.g. "Let me check that for you").
* [**Code Node**](/build/conversation-flow/code-node): Runs JavaScript in Retell's sandbox on entry — no external server needed. Best for data transformation, calculations, formatting, and simple read-only lookups via `fetch()`. Has access to dynamic variables and call metadata, and can store return values into dynamic variables. For anything needing secrets, authentication, or writes, use a custom function instead.
* [**SMS Node**](/build/conversation-flow/sms-node): Sends an SMS during an active phone call, to the caller or another number. Requires an SMS-enabled or SMS-approved Retell number. Transitions once the SMS succeeds or fails. *(Voice agents only.)*
* [**MCP Node**](/build/conversation-flow/mcp-node): Calls a tool on an external MCP (Model Context Protocol) server on entry. Connect your server, select a tool, and optionally extract response values into dynamic variables for later nodes. The agent can speak while it runs.
### Call control nodes
* [**Call Transfer Node**](/build/conversation-flow/call-transfer-node): Transfers the call to another phone number or SIP URI. Enable **Talk While Waiting** to speak a message before starting the transfer. Supports cold, warm (with human detection, whisper/three-way messages), and agentic warm transfer. *(Voice agents only.)*
* [**Transfer Agent Node**](/build/conversation-flow/transfer-agent-node): Hands the conversation to a different Retell agent mid-call. Near-instant (no new phone call), the destination agent inherits the full conversation history, and no separate phone number is needed. Preferred over call transfer when routing between AI agents (e.g. front-desk → booking, or language-based routing).
* [**Press Digit Node**](/build/conversation-flow/press-digit-node): Navigates IVR menus by sending DTMF tones. The agent doesn't speak — it listens to IVR prompts and infers which digit to press from your instruction, evaluating on each IVR utterance. Give clear guidance on which options to choose and which to avoid. *(Voice agents only.)*
* [**End Node**](/build/conversation-flow/end-node): Ends the call. Enable **Speak During Execution** with an instruction so the agent gives a closing message before hanging up; otherwise the call ends abruptly.
### Logic and structure
* [**Logic Split Node**](/build/conversation-flow/logic-split-node): Evaluates conditions and branches the flow immediately on entry — the agent doesn't speak. Useful for splitting on dynamic variables or conditions without stacking everything onto the previous node. Always has an else destination as a fallback so the flow never gets stuck.
* [**Subflow**](/build/conversation-flow/components): Packages a reusable subflow (a group of nodes) that appears as a single node on the main canvas. Subflows can be local to one agent or shared across agents in a library; they run their internal nodes and return control to the main flow via an exit node. Tools defined inside a subflow stay scoped to it.
## How nodes connect
Every node except the end node moves the call forward through edges. A node can have several kinds:
* **Regular edges** each carry a transition condition — a prompt the LLM evaluates, or an equation over dynamic variables — plus a destination node.
* **Else edge** is the fallback: it fires when no other condition matches, so the flow never gets stuck.
* **Always edge** transitions unconditionally after the user responds.
* **Skip Response edge** appears when the node's Skip Response setting is on: the node transitions as soon as the agent finishes speaking, without waiting for a reply.
How conditions are written, and the exact order they're evaluated in, is covered in [transition conditions](/build/conversation-flow/transition-condition).
## Add a node
Click a node type in the left sidebar to add it to the canvas.
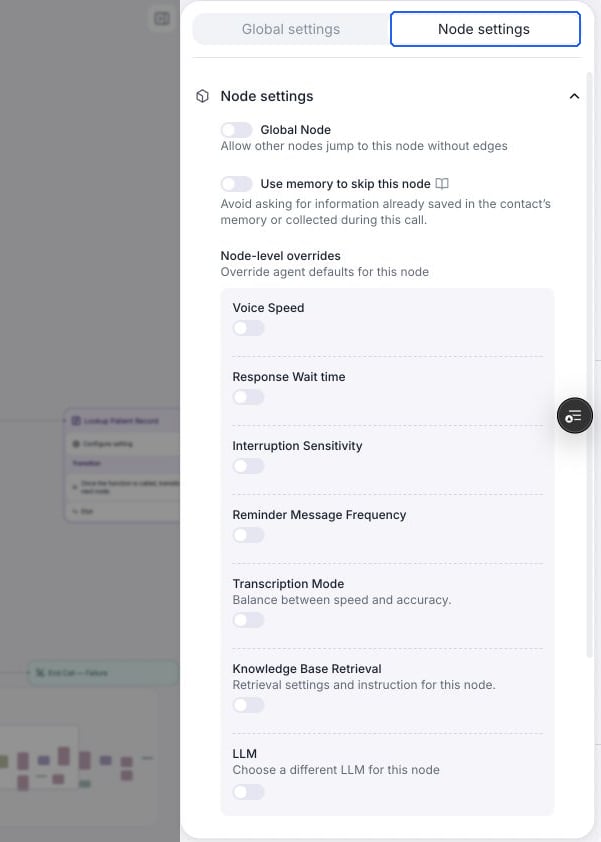
 Select a node to open the **Node settings** tab on the right. If the panel is collapsed, select **Open settings**. Fill in the instruction inside the node and expand the settings sections you need.
Function, Call Transfer, Agent Transfer, Code, MCP, and Subflow nodes can keep their configuration section and **Node settings** section open together. Opening one section does not close the other or change any settings. See the guide for each node type for details.
Select a node to open the **Node settings** tab on the right. If the panel is collapsed, select **Open settings**. Fill in the instruction inside the node and expand the settings sections you need.
Function, Call Transfer, Agent Transfer, Code, MCP, and Subflow nodes can keep their configuration section and **Node settings** section open together. Opening one section does not close the other or change any settings. See the guide for each node type for details.
 Click the bottom part of the node to add edges, then write a [transition condition](/build/conversation-flow/transition-condition) for each.
Click and hold the circle to start a line that connects the node to another node, and another node to this node.
Click the bottom part of the node to add edges, then write a [transition condition](/build/conversation-flow/transition-condition) for each.
Click and hold the circle to start a line that connects the node to another node, and another node to this node.
 ## Organize nodes
After adding many nodes, the canvas can get cluttered. Use the **Organize** button to arrange them automatically.
## Organize nodes
After adding many nodes, the canvas can get cluttered. Use the **Organize** button to arrange them automatically.
 Name your nodes. Call transcripts in the history tab show transitions by node name, so descriptive names make past calls much easier to debug.
## Copy and paste nodes
You can copy nodes and paste them elsewhere on the canvas, into another flow, or even into a different browser tab. Retell uses your system clipboard, so a copy stays available across tabs and windows.
Click a node, or click and drag to select multiple nodes and sticky notes.
Press `Cmd/Ctrl + C`. A **Copied** confirmation shows how many items were copied. Any selected sticky notes, and the tools attached to the selected nodes, are copied along with them.
Move your cursor to where you want the items to appear and press `Cmd/Ctrl + V`. A **Pasted** confirmation appears, and the nodes, notes, and tools are added at your cursor, automatically positioned to avoid overlapping existing nodes.
A few things to keep in mind:
* If a copied tool already exists in the destination, it isn't added again — the pasted node reuses the existing tool.
* Component nodes can't be pasted inside a component editor. If you try, Retell shows a **Cannot Paste** message.
## FAQ
Split a node when you need to reduce its context or control which instructions, tools, or settings apply to part of the task. If the agent struggles to follow instructions, first simplify the existing prompt and remove unnecessary tools. More nodes do not automatically improve reliability; see [how node boundaries affect conversations](/build/conversation-flow/best-practices#beware-of-rigid-conversation-flows).
Use the scroll wheel on a mouse, or pinch on a touchpad.
No, you can add as many nodes as you want.
This documentation is built and hosted on [Mintlify](https://mintlify.com), a developer documentation platform.
Name your nodes. Call transcripts in the history tab show transitions by node name, so descriptive names make past calls much easier to debug.
## Copy and paste nodes
You can copy nodes and paste them elsewhere on the canvas, into another flow, or even into a different browser tab. Retell uses your system clipboard, so a copy stays available across tabs and windows.
Click a node, or click and drag to select multiple nodes and sticky notes.
Press `Cmd/Ctrl + C`. A **Copied** confirmation shows how many items were copied. Any selected sticky notes, and the tools attached to the selected nodes, are copied along with them.
Move your cursor to where you want the items to appear and press `Cmd/Ctrl + V`. A **Pasted** confirmation appears, and the nodes, notes, and tools are added at your cursor, automatically positioned to avoid overlapping existing nodes.
A few things to keep in mind:
* If a copied tool already exists in the destination, it isn't added again — the pasted node reuses the existing tool.
* Component nodes can't be pasted inside a component editor. If you try, Retell shows a **Cannot Paste** message.
## FAQ
Split a node when you need to reduce its context or control which instructions, tools, or settings apply to part of the task. If the agent struggles to follow instructions, first simplify the existing prompt and remove unnecessary tools. More nodes do not automatically improve reliability; see [how node boundaries affect conversations](/build/conversation-flow/best-practices#beware-of-rigid-conversation-flows).
Use the scroll wheel on a mouse, or pinch on a touchpad.
No, you can add as many nodes as you want.
This documentation is built and hosted on [Mintlify](https://mintlify.com), a developer documentation platform.