

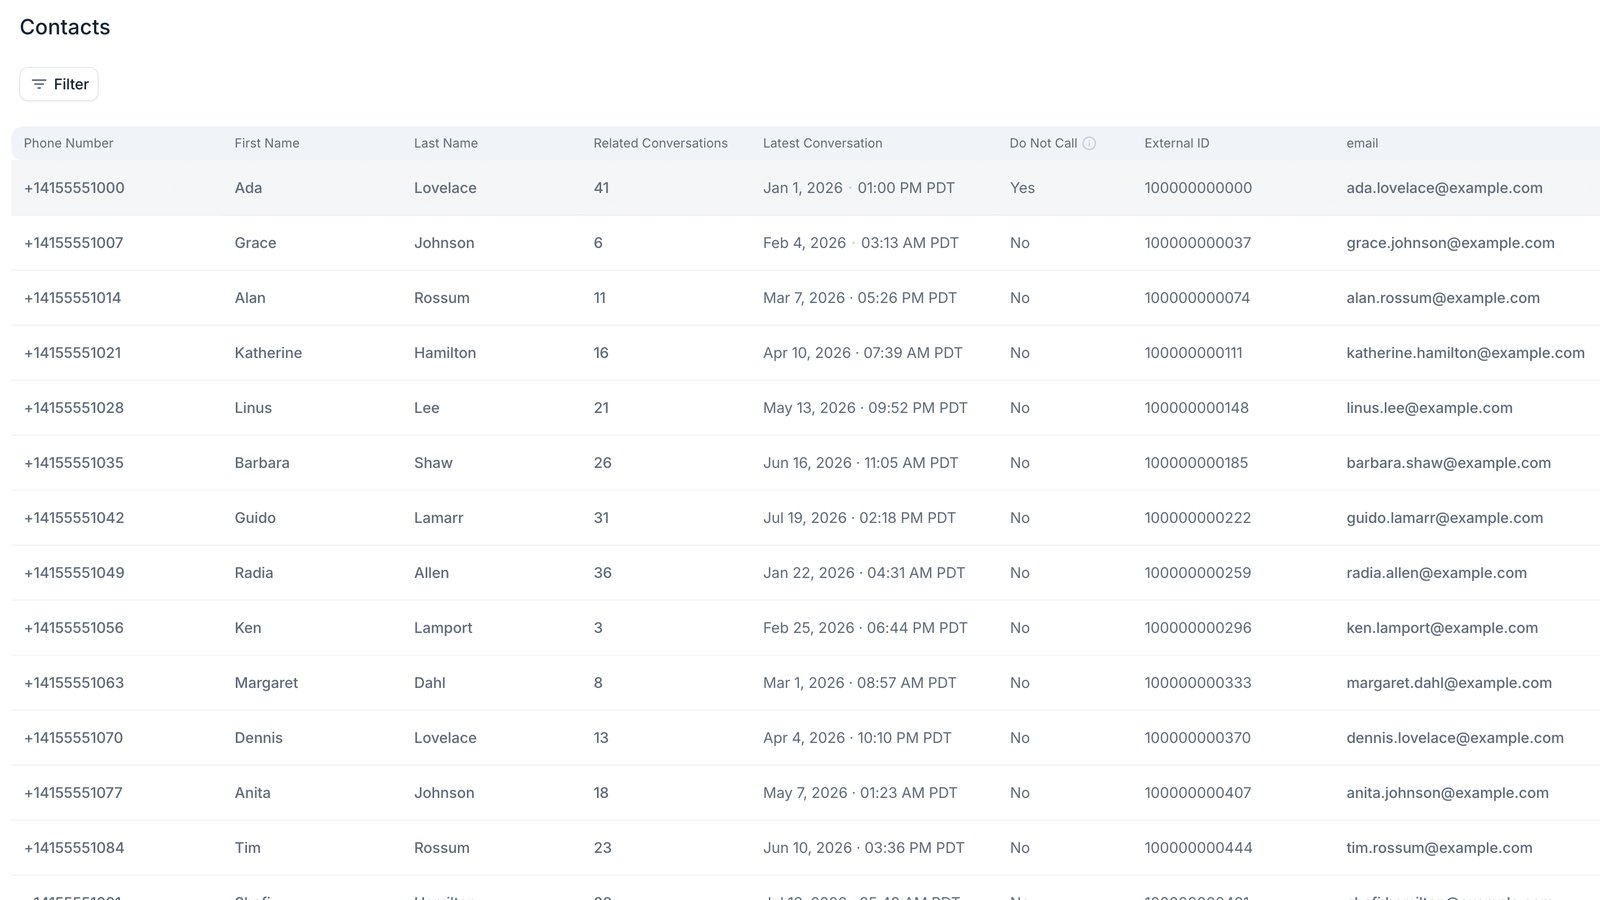
The Contacts page, showing each contact's conversation count and last conversation.
When to use it
- Your CRM is the source of truth. Sync contacts in from your CRM and map their fields to agent variables once, instead of passing the same values on every API call.
- Conversations span more than one call. When a long call drops or the person calls back, the agent picks up with the context from last time rather than restarting discovery.
- You run follow-up or chase sequences. The next call can act on what the last one produced.
- You want one set of fields across agents. Post-call data mappings are set per workspace, not per agent, so every agent writes to the same contact fields.
Example
A tutoring company runs 20-minute enrollment calls. They storeprogram_interest, budget_range, and last_topic_discussed as contact fields, filled from Post Call Extraction. When a prospect calls back after a dropped call, the agent already has all three and resumes at the pricing conversation instead of starting over.
How contacts are created
Contacts arrive through these flows, all matched by phone number:- Automatically, after a conversation. When a phone call or SMS chat ends, Retell looks up the number (the caller’s number on inbound, the number you dialed on outbound). If no contact matches, it creates one, then updates the contact’s conversation count and last-conversation time. Web calls and web chats have no phone number, so they don’t create contacts.
- Manually, from Actions → Add contact, or through Actions → Upload CSV.
- From your CRM, if you’ve connected a CRM integration and configured inbound sync.
Add a contact
Open the form
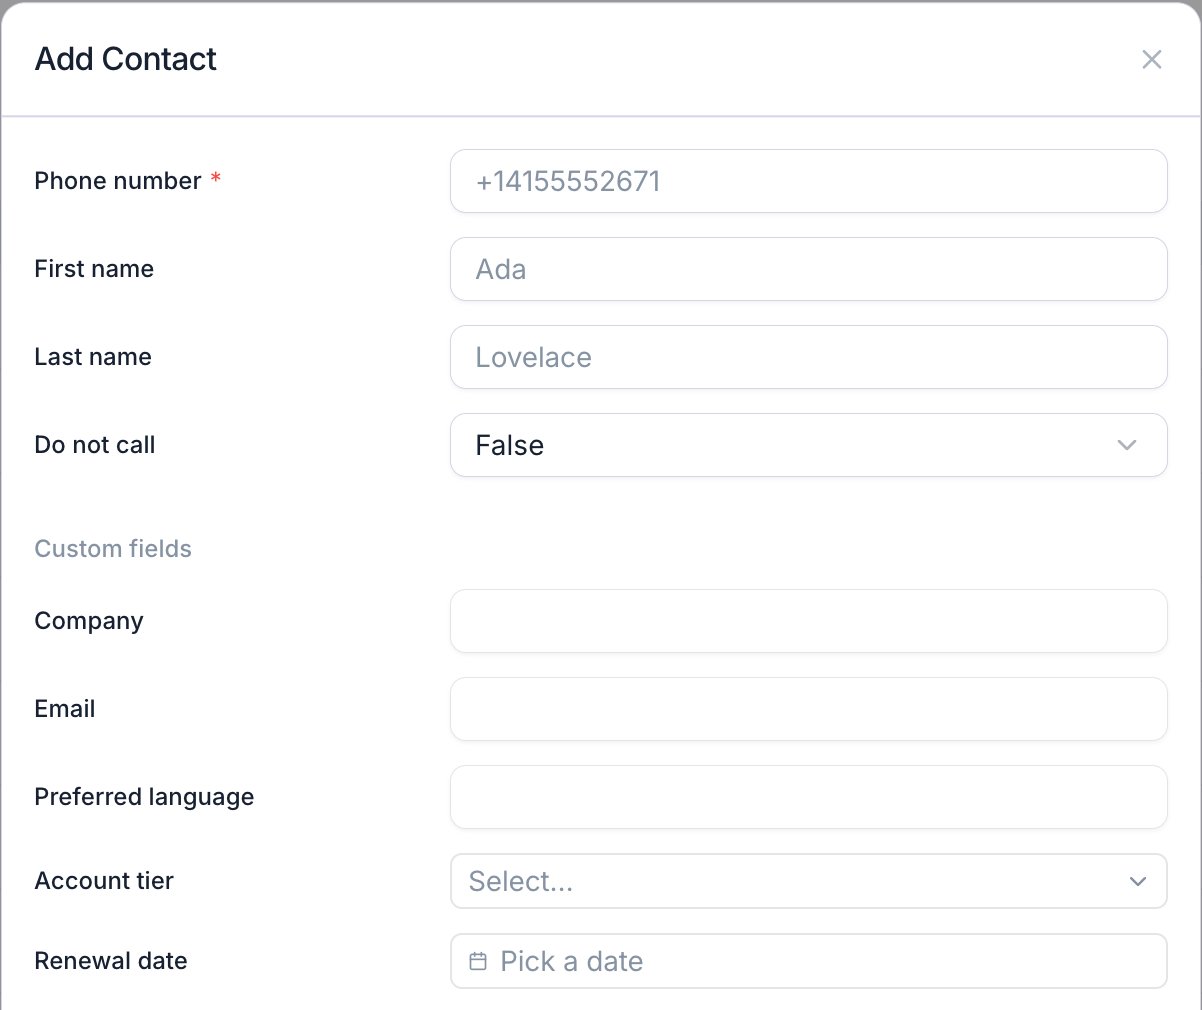
The Add Contact form, with the workspace's custom fields below the built-in ones.
Enter the phone number
+14155552671. This is the key everything else matches on.Fill in the rest
Create
Work with the contacts table
The table lists every contact in the workspace with these built-in columns, plus one for each custom field you’ve defined:Open a contact
Selecting a row opens a panel with two halves:- Contact information lists every field on the record and lets you edit them in place. Saving an edit on a CRM-linked contact also pushes the change back to your CRM, if outbound sync is configured.
- Conversations lists the calls and chats attached to that number, newest first, with total time and a split of inbound calls, outbound calls, and messages. Selecting one opens the full session.
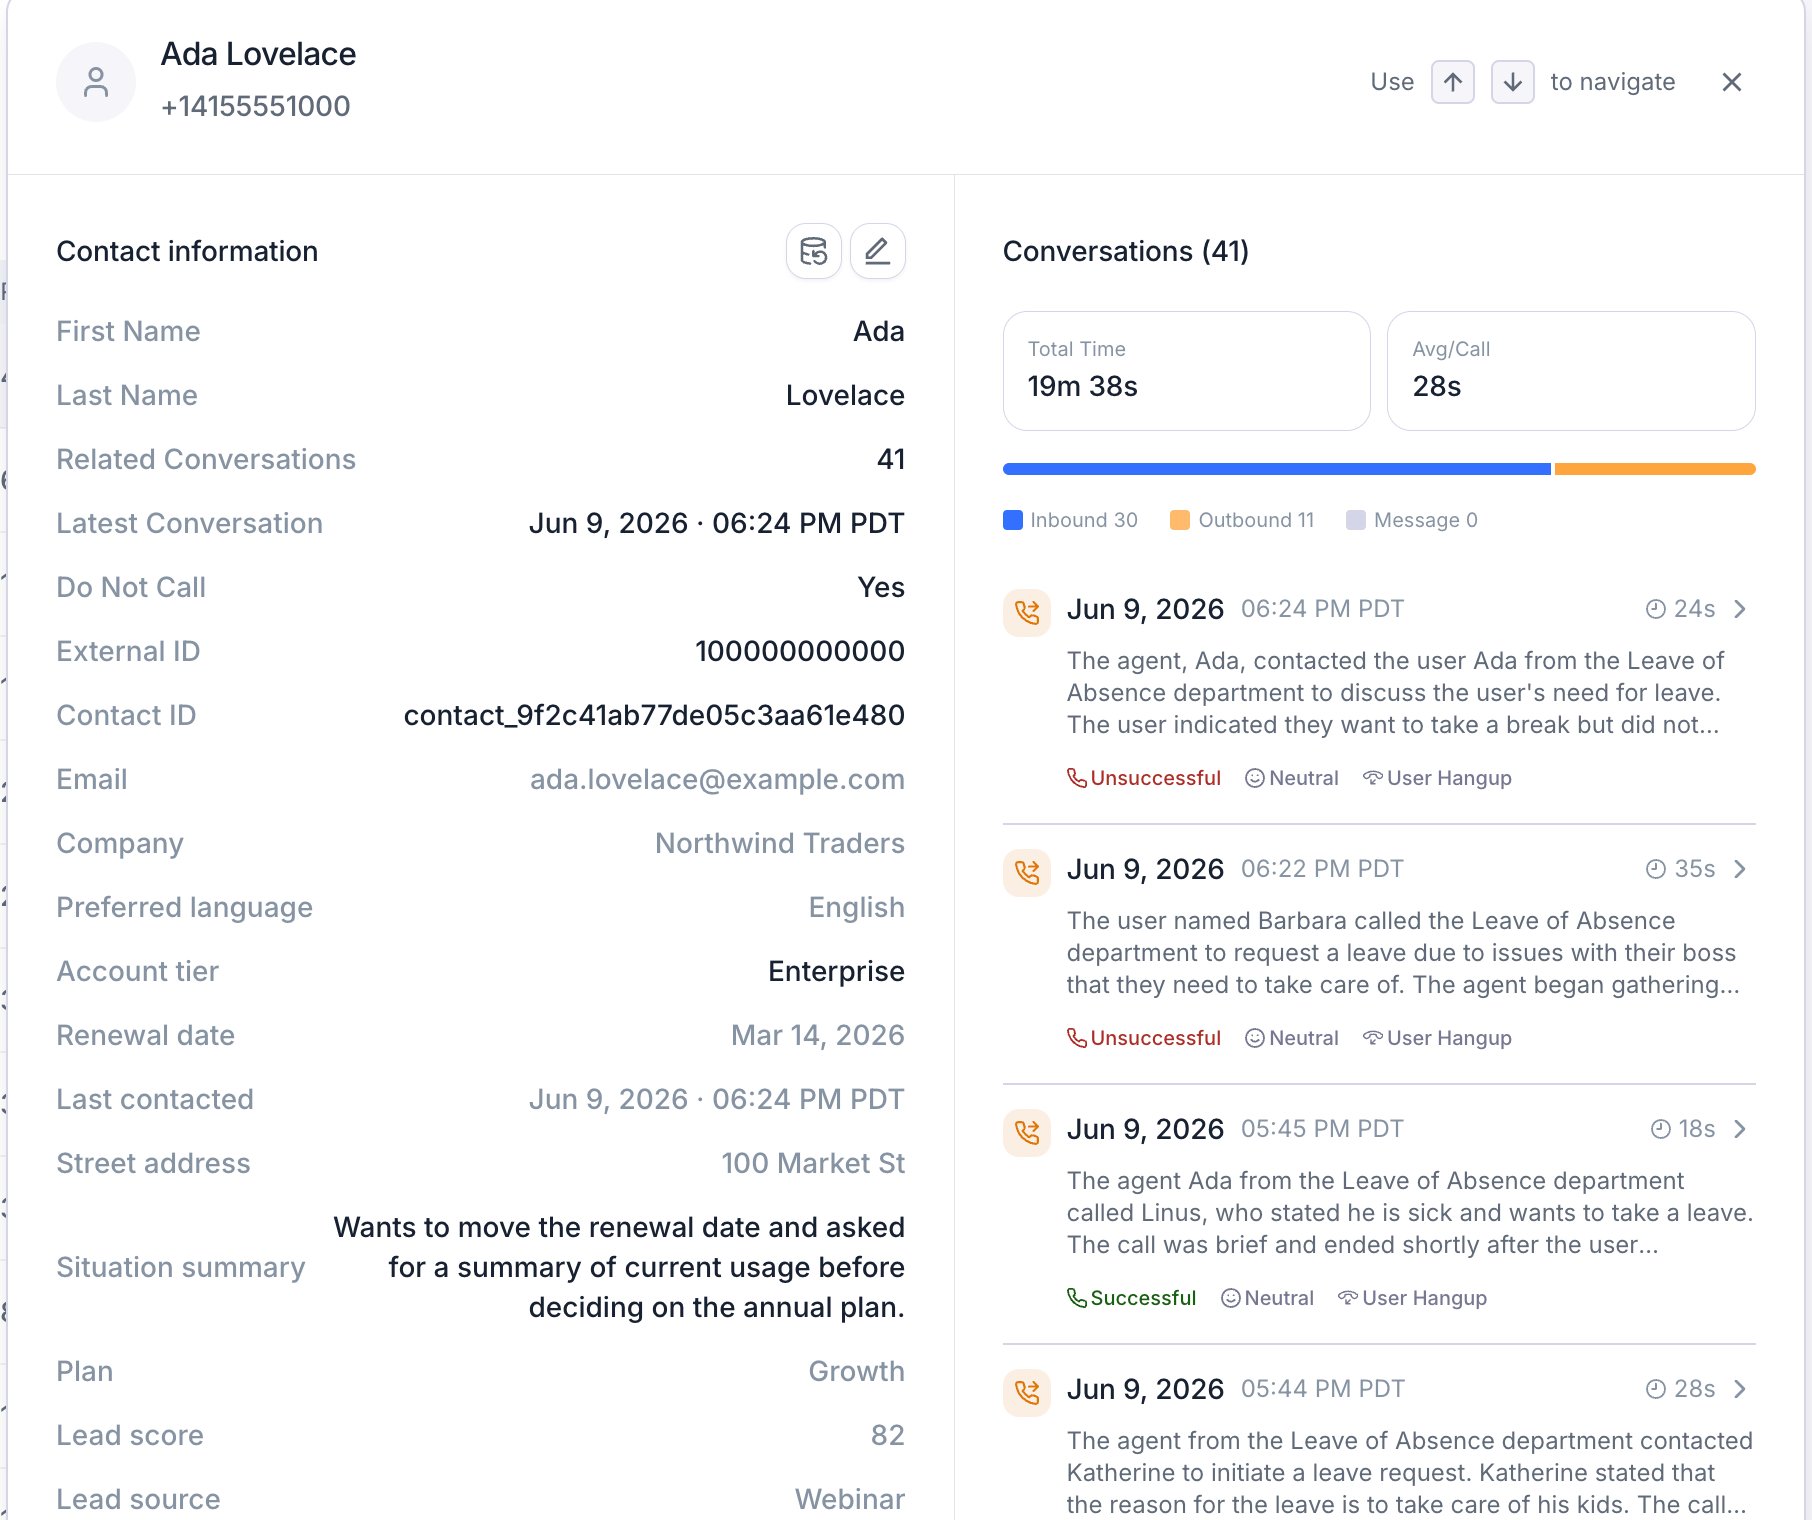
A contact's fields on the left, every call and chat with that number on the right.
View and edit conversation memory
The Conversation Memory field in Contact information holds the contact’s running brief. Select View all to expand a long memory and View less to collapse it. If the contact has no saved memory, the field shows “No memory yet. Conversation memory can be enabled in agent settings.” This message appears regardless of the agents’ settings. To check whether an agent saves memory, open Post call memory settings on that agent and check Save conversation to memory.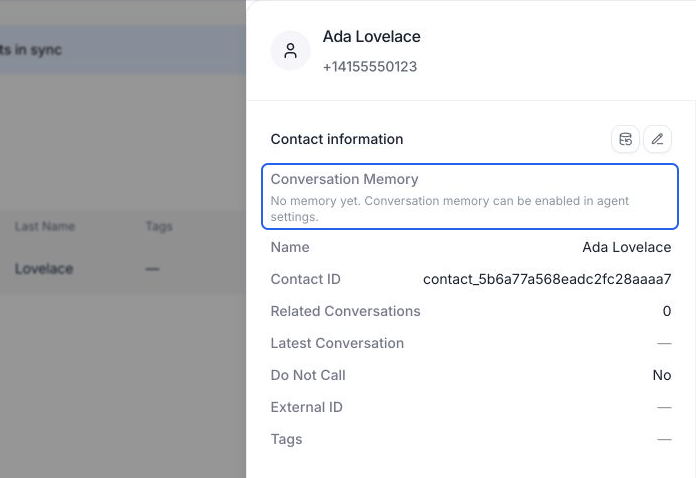
An empty memory shows the same message regardless of whether an agent has saving enabled.
Edit Contact information
Apply the draft
Save the contact
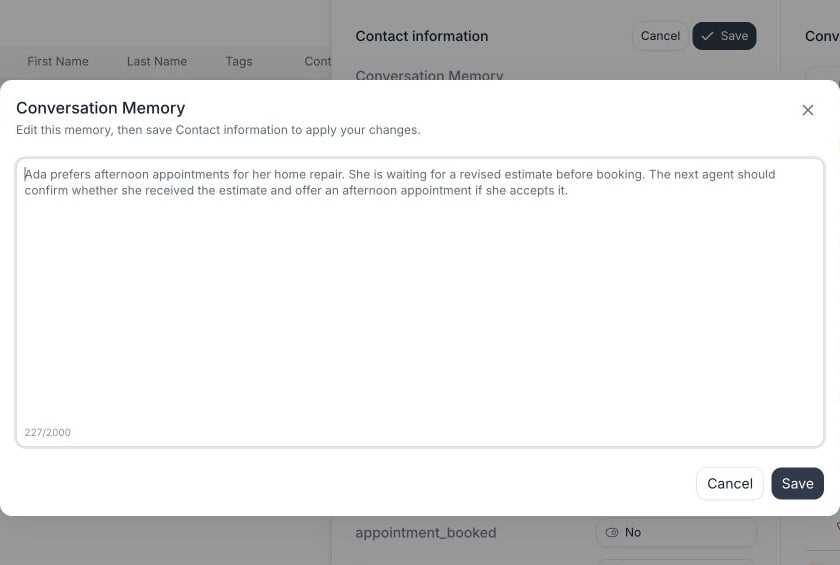
The expanded memory editor stages changes; save Contact information afterward to apply them.
Define contact fields
Beyond the built-in fields, you can define custom fields to store anything else you want to keep about a person. Open Actions → Manage contact fields. The fields table shows, for each field, its type, the CRM field it syncs with, the Post Call Extraction field that writes to it, and when it last changed.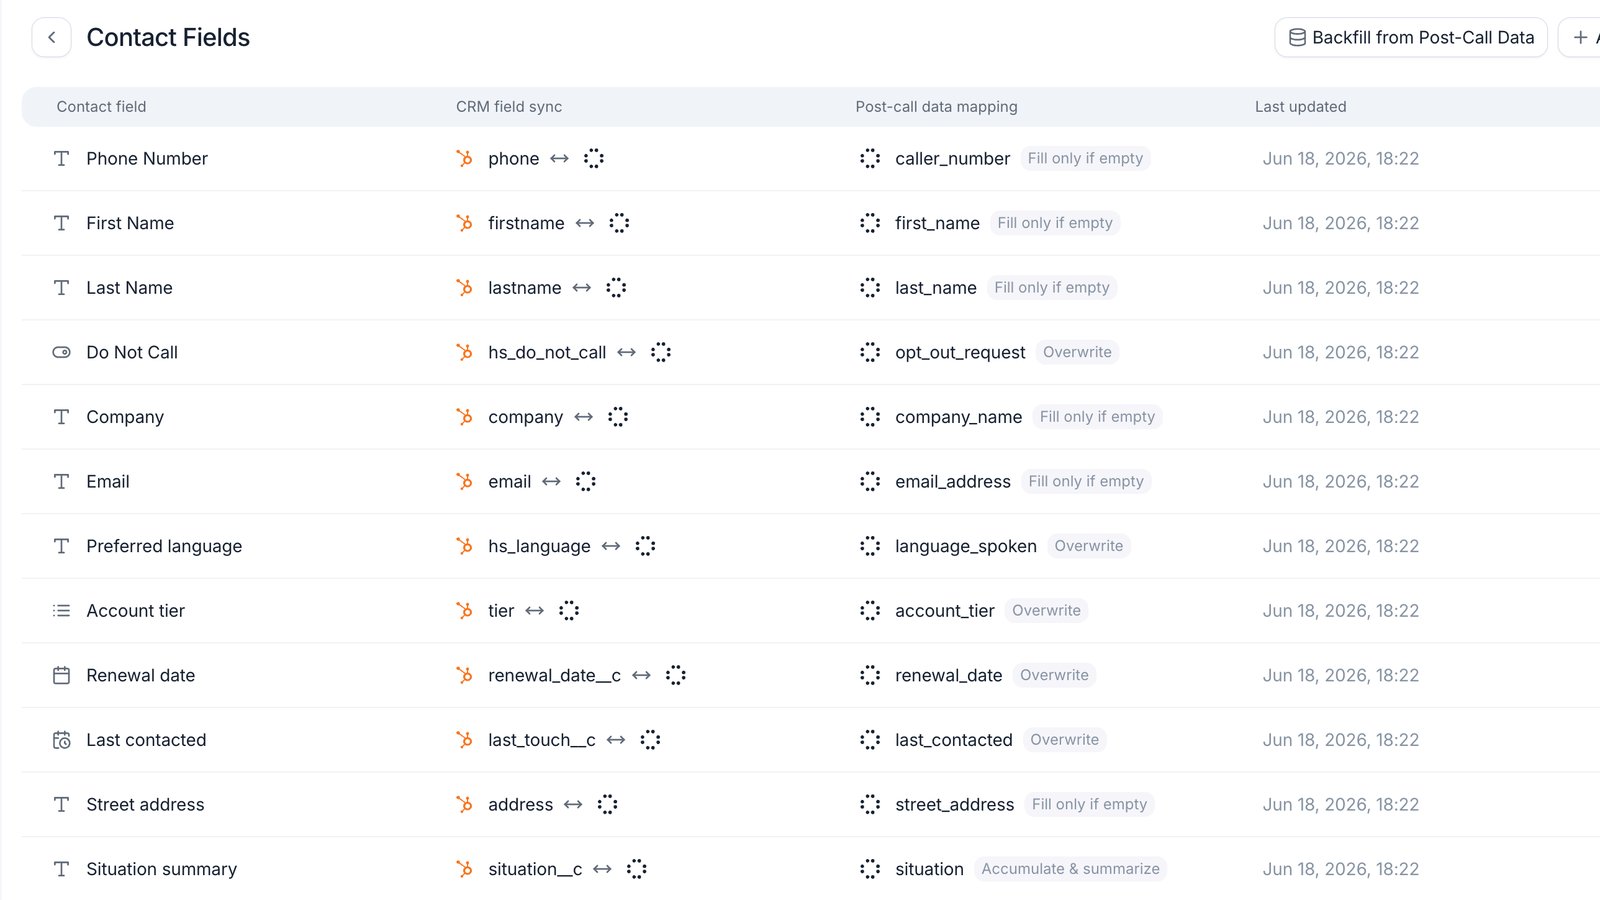
Contact fields, with CRM sync and post-call mappings shown per field.
Add the field
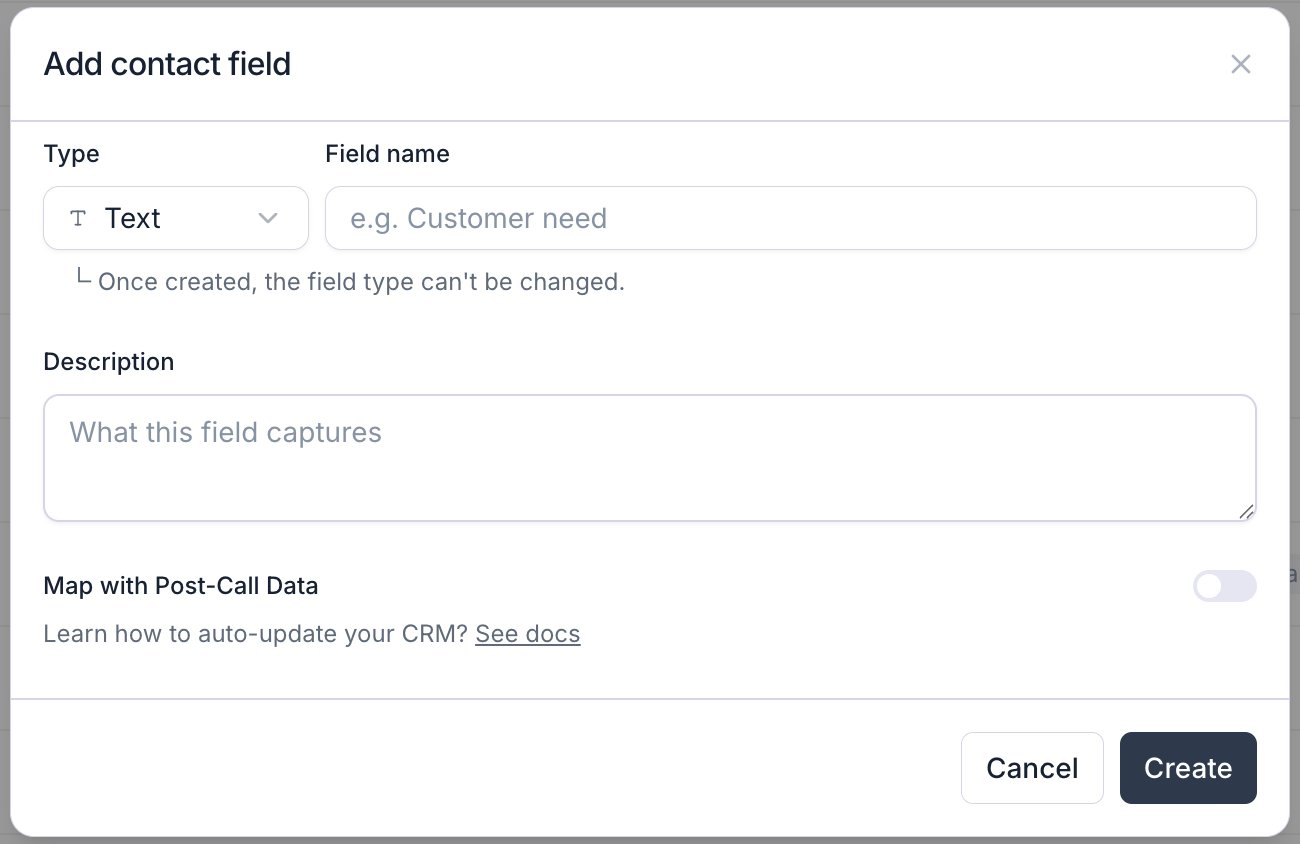
Adding a contact field. The type can't be changed once the field exists.
Name it
contact or external (both reserved), and can’t repeat an existing field.Describe what it holds
Map it to post-call data (optional)
- Overwrite replaces the stored value every time.
- Fill only if empty writes once and leaves it alone after that.
- Accumulate & summarize merges the old and new values with a model, following your field description.
Import from CSV
Use Actions → Upload CSV to import a contact list, such as leads from an event. Include a header row and a phone number column. CSV files can be up to 50 MB. Contacts are matched by phone number. If a number already exists, the import overwrites its mapped fields and leaves unmapped fields unchanged. New numbers create new contacts. Imported tags are added to existing tags without duplicates.Upload and preview
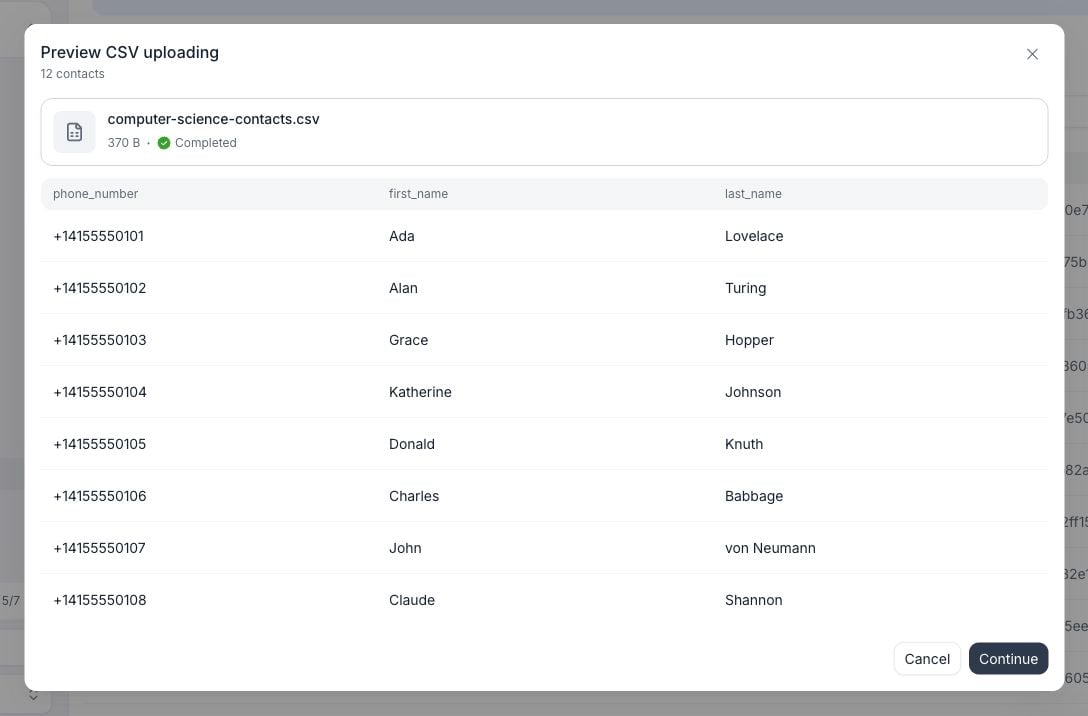
Preview a CSV with 12 sample contacts, starting with Ada Lovelace.
Map the columns
Add tags and confirm
event_lead. These tags apply to every contact in the import. Leaving this step empty keeps existing contacts’ tags unchanged.Select Confirm to submit the import.Use contact data in a conversation
When a phone call or SMS chat starts, Retell looks up the contact by number and passes its fields to the agent as dynamic variables:first_name, last_name, do_not_call, contact_memory when stored, and one per custom field, each named after the field. Reference them in the prompt the same way as any other dynamic variable, for example {{first_name}}.
This applies to inbound calls, outbound calls, batch calls, and SMS chats. If no contact matches the number, the variables are absent, so write prompts that read naturally without them. Enable Use contact memory to include stored memory in the agent’s context automatically, without adding a variable to its prompt.
Read contacts from the API
The Contact API returns the same records the dashboard shows, so your own systems can check who you’ve already spoken to before placing a call. Every contact carries:- Get contact by phone looks up one number. Send it in E.164 format.
- List contacts filters the whole set by
last_conversation_timestamp,do_not_call,external_id, tags, and custom fields, up to 1,000 per page. - List contact conversations returns every call and chat with the number, newest first, with each one’s start time, duration, direction, disconnection reason, summary, sentiment, and success flag.
last_conversation_timestamp also covers dial attempts. Web calls and web chats never count.
Limit how often you call a number
Retell doesn’t cap how often your agent calls a number. Create Phone Call checksdo_not_call only when you pass honor_internal_dnc: true (see do-not-call requests), and batch calls don’t check it. To avoid calling someone too often, check the contact before you dial.
A debt collection team, for example, calls each customer at most once every 48 hours. Before each call, their dialer looks up the number and skips it if the last conversation was too recent:
do_not_call is true or last_conversation_timestamp is less than 48 hours ago. A 404 means you’ve never spoken to that number, so it’s safe to call.
To build a whole call list at once, ask List contacts for everyone last spoken to before your cutoff who isn’t marked do-not-call:
start_timestamp falls inside the window.
Backfill fields from past conversations
Enabling memory saving or adding an extraction mapping only affects future conversations. To populate contacts from past phone calls and SMS chats, open Actions → Backfill. The dialog is titled Backfill from past conversations.Choose the fields
Filter the conversations
Start and monitor the backfill
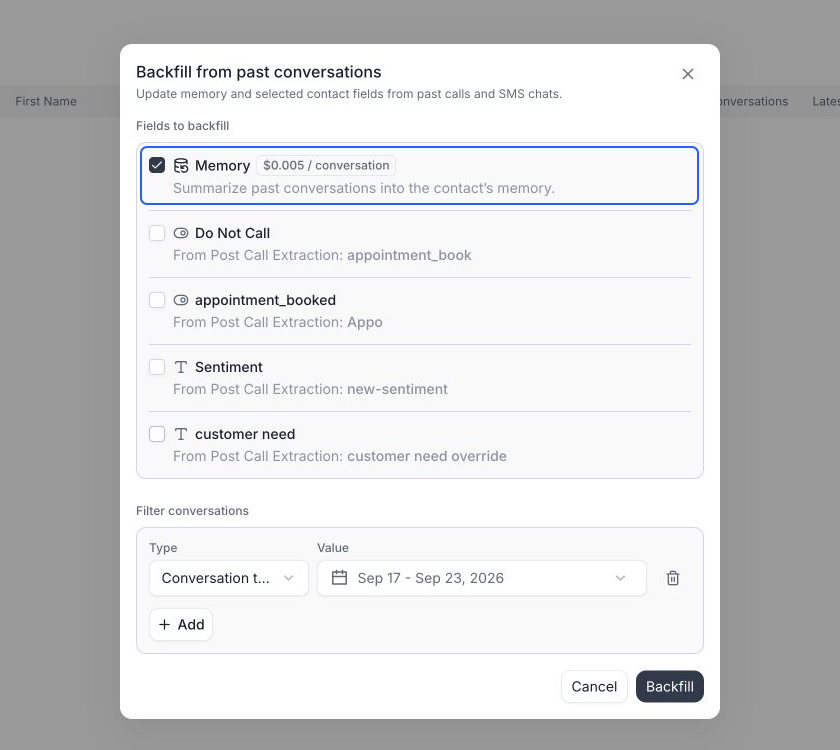
Select Memory to summarize historical conversations independently of mapped fields.
- The agent’s latest configuration must have Save conversation to memory enabled. This lets you process earlier conversations even if saving wasn’t enabled when they happened.
- Only ended phone calls and SMS chats with retained transcripts are eligible. Conversations stored with Basic Attributes Only, missing or unreadable transcripts, and transcripts with failed PII redaction are skipped. A conversation also needs a usable user message to generate memory.
- Retell starts with the contact’s current memory and processes selected conversations oldest first, using the current workspace memory prompt. A failed or empty rewrite keeps the previous brief.
- The price is $0.005 per conversation processed as of September 2026, not per contact. Repeating a backfill can process and charge for the same conversations again.
Keep contacts in sync with your CRM
With a CRM connected, contacts sync both directions: CRM records flow in as contacts, and edits flow back out. Two entries in the Actions menu control it, both disabled until a CRM is connected:- Manage CRM sync opens the field mapping settings. See CRM data mappings.
- Run full sync re-imports the full contact set instead of waiting for the next scheduled sync.
Who can use it
Contacts needs CRM view permission to open, and CRM edit permission for anything that changes data: adding contacts, editing fields or memory, running a backfill, or triggering a full sync. Without edit permission the controls are visible but disabled. See Access Control.FAQ
Can I import contacts from a CSV?
Can I import contacts from a CSV?
Why do contacts appear that I never added?
Why do contacts appear that I never added?
Why doesn't a contact show a conversation I know happened?
Why doesn't a contact show a conversation I know happened?
Can I delete a contact?
Can I delete a contact?
What happens to my contacts if I disconnect the CRM?
What happens to my contacts if I disconnect the CRM?